Remote access to a Raspberry Pi is an essential skill for anyone looking to leverage the full potential of this versatile device. Whether you're setting up a home server, running a media center, or managing IoT devices, being able to control your Raspberry Pi from anywhere can significantly enhance your workflow. However, ensuring that this remote access is secure and reliable requires careful setup and configuration.
In this guide, we will walk you through the process of securely setting up remote access to your Raspberry Pi via SSH. This step-by-step tutorial is designed for beginners who are new to networking and SSH configurations. By following these instructions, you'll be able to connect to your Raspberry Pi remotely while maintaining robust security measures.
To connect to your Raspberry Pi remotely, you need to ensure that connections are allowed on Port 22 (SSH). Begin by checking your network settings and firewall rules to allow incoming SSH connections. If you’re reading this, you probably have a specific use case in mind, such as accessing files, running scripts, or monitoring system performance. However, if you just stumbled upon this and are wondering why you might need remote access, consider scenarios like troubleshooting issues when you're away from your device or automating tasks without physical interaction.
The RealVNC server provided by the Raspberry Pi team in the GUI version(s) of their operating system allows you to connect over the Internet. This feature is particularly useful for users who prefer a graphical interface rather than command-line interactions. It provides a seamless way to interact with your Raspberry Pi remotely, making it ideal for presentations, demonstrations, or collaborative projects where visual feedback is crucial. Additionally, VNC offers encryption options to protect your data during transmission.
Understanding SSH for Secure Connections
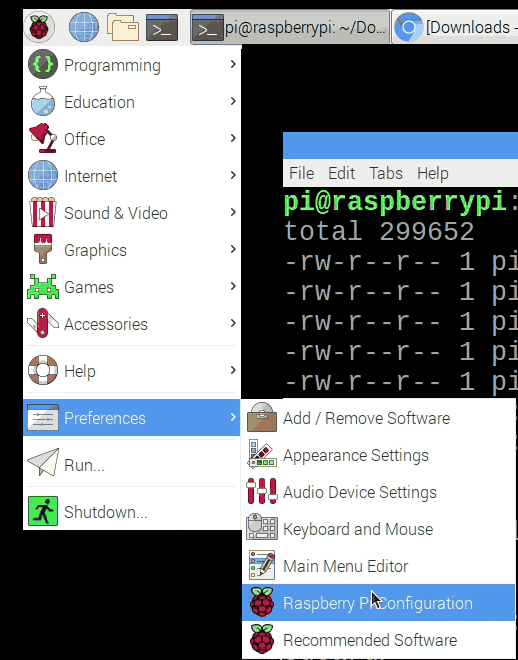
SSH, or Secure Shell, is a cryptographic protocol used for secure communication over unsecured networks. It encrypts all data transmitted between your local machine and the Raspberry Pi, ensuring that sensitive information remains private. To set up SSH on your Raspberry Pi, you can enable it through the Raspberry Pi Configuration tool or by editing the boot configuration file. Once enabled, you can test the connection using an SSH client like PuTTY on Windows or the built-in terminal on macOS and Linux.
For added security, consider changing the default SSH port from 22 to a non-standard port. This simple measure can deter automated attacks that target common ports. Additionally, disable password authentication and rely solely on public key authentication. This method involves generating a pair of keys—a public key stored on the Raspberry Pi and a private key kept securely on your local machine. By doing so, even if someone intercepts your connection, they won't be able to gain unauthorized access without the private key.
Another important aspect of securing your SSH setup is regularly updating your Raspberry Pi's software. Keeping your system up-to-date ensures that any known vulnerabilities are patched, reducing the risk of exploitation. You can automate this process using tools like cron jobs to schedule regular updates, thus minimizing manual intervention and maintaining a secure environment.
Exploring Remote Access Methods Beyond SSH
While SSH is a powerful tool for remote access, there are alternative methods worth exploring depending on your specific needs. For instance, distributing Raspberry Pi devices with pre-installed PBX systems in the cloud requires a reliable mechanism for remote control. In such cases, implementing a custom solution using SSH tunnels or third-party services can provide the necessary functionality while maintaining security.
One approach is to utilize a Virtual Private Network (VPN) to create a secure network bridge between your local machine and the Raspberry Pi. By connecting both devices to the same VPN, you can establish a private network where SSH connections occur within a secured environment. This method not only enhances security but also simplifies the setup process by eliminating the need for complex port forwarding configurations.
Additionally, consider integrating monitoring tools to track the health and status of your Raspberry Pi remotely. Services like Nagios or Zabbix can alert you to potential issues before they escalate, allowing for proactive maintenance and reducing downtime. These tools can be configured to send notifications via email or messaging apps, ensuring you stay informed about the condition of your devices at all times.
Connecting Through SSH with IP Address
Connecting to an SSH server involves opening a terminal window on your computer and entering the appropriate command. Replace the placeholder
If you encounter connectivity issues, verify that the Raspberry Pi is reachable from your network. Check its IP address by logging into your router or using commands like ping or nmap to scan the local network. Ensure that no firewalls or network policies block the SSH port, as this could prevent successful connections. In some cases, restarting the SSH service on the Raspberry Pi can resolve transient problems.
For advanced users, scripting SSH commands can streamline repetitive tasks. Create shell scripts that automate routine operations, such as backing up files, updating software, or retrieving system logs. These scripts can be scheduled using cron jobs to run at specified intervals, further enhancing productivity and efficiency in managing your Raspberry Pi remotely.
Troubleshooting Common Issues
When setting up remote access, you may encounter challenges such as permission errors or failed connections. One common issue arises when attempting to execute sudo commands via SSH without proper authentication. Ensure that the user account has sufficient privileges and that the SSH keys are correctly configured. Referencing the official Raspberry Pi documentation can provide insights into resolving these problems effectively.
In situations where direct SSH access isn't feasible due to restrictive network environments, consider utilizing intermediate servers or proxies. Setting up a jump host can facilitate secure connections by acting as a gateway between your local machine and the Raspberry Pi. This setup is especially useful in corporate settings where strict network policies are enforced.
Finally, always document your configuration steps and maintain backups of critical files. This practice ensures that you can quickly restore your setup in case of unforeseen issues or hardware failures. Regularly review and update your security measures to adapt to evolving threats and maintain the integrity of your remote access infrastructure.
